


Unresponsive and breathing
What to look for
If your child is not responding to you and you think they are unresponsive, ask loudly: ‘What has happened?’ or ‘Open your eyes’. Place one hand on their shoulder and tap gently. If they still do not respond, it’s likely they’re unresponsive.
What you need to do
If you think your child is unresponsive, check to see if they are still breathing normally. If they are unresponsive and breathing, here’s what you need to do:
Step 1 – Open their airway
- Place one hand on the child’s forehead and gently tilt their head back. As you do this, their mouth will fall open slightly.
- Place the fingertips of your other hand on the point of their chin and lift it.

Step 2 – Check to ensure they are breathing normally
- Look, listen and feel for normal breathing – chest movement, sounds and breaths on your cheek. Do this for no more than ten seconds.

- If they are breathing normally, put them into the recovery position to keep their airway open.
Step 3 – Put them in the recovery position
The next three steps are for if you find the child lying on their back. If you find them lying on their side or their front you may not need all three.
- Place their arm nearest you at a right angle to their body, with the palm facing upwards.
- Take their other arm and place it across their chest so the back of their hand is against their cheek nearest you, and hold it there. With your other hand, lift their far knee and pull it up until their foot is flat on the floor.
- Now roll the child on to their side. Carefully pull on their bent knee and roll them towards you. Once you’ve done this, the top arm should be supporting their head and the bent leg should be on the floor to stop them from rolling over too far.

- Next, check that their airway is open, so they can breathe, and any fluid in their mouth can drain away. To do this, tilt their head back, gently tilt their chin forward and make sure that their airway will stay open and clear.
Step 4 – If you suspect a spinal injury
If you think your child could have a spinal injury, you must try and keep their neck as still as possible. Instead of tilting their neck, use the jaw thrust technique:
- Place your hands on either side of their face and with your fingertips gently lift the jaw to open the airway, avoiding any movement of their neck.

Step 5 – Call for help
- Once you’ve put them safely into the recovery position, call 999 or 112 for emergency help.
- Remember that until help arrives you must keep checking that they’re still breathing normally.
- If they stop breathing normally at any point, call 999 or 112 straight away and get ready to give them chest compressions and rescue breaths – CPR.
Unresponsive and not breathing
If your child is not responding to you and you think they are unresponsive, ask loudly ‘What’s happened?’ or say to them: ‘Open your eyes!’. Place one hand on their shoulder and tap gently. If they still do not respond, it’s likely that they’re unresponsive.
Open their airway and check to see if they are breathing normally by looking for chest movement, listening for the sounds of normal breathing and seeing if you can feel their breaths on your cheek.
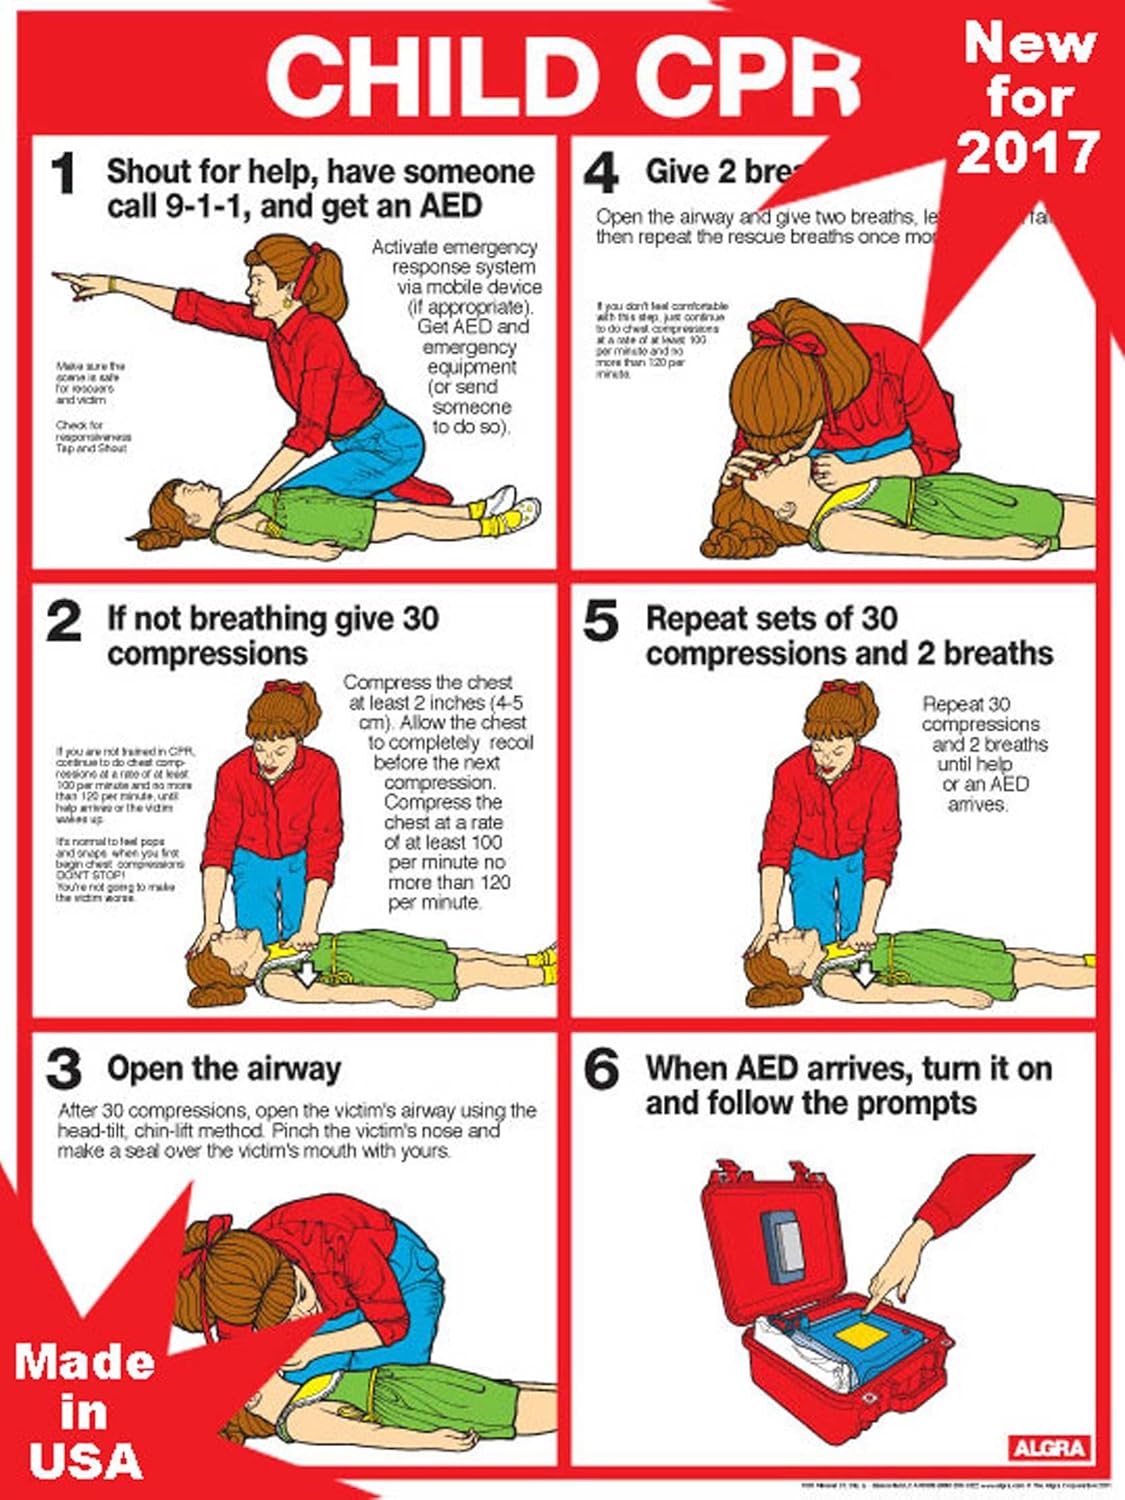
If they are not breathing, you need to start CPR (cardiopulmonary resuscitation – a combination of chest compressions and rescue breaths) straight away.
What you need to do
If someone is with you, get them to call 999 or 112 for emergency help.
If you’re on your own, you need to give one minute’s worth of CPR – cardiopulmonary resuscitation – before you call for help. This involves giving chest compressions and rescue breaths to keep the child’s circulation going.
How to perform CPR on a child
- Kneel down beside the child on the floor, level with their chest.
- Give five initial rescue breaths before starting the sequence of 30 chest compressions and two rescue breaths.
Step 1 of 1
- Ensure the child’s airway is open.

Step 2 of 7
- Pinch their nose firmly closed.

Step 3 of 7
- Take a deep breath and seal your lips around their mouth.
- Blow steadily into the mouth until the chest rises.

Step 4 of 7
- Remove your mouth and allow the chest to fall.

- Give four more rescue breaths.
- Now give 30 chest compressions.
Step 5 of 7
- Place the heel of one hand towards the end of their breastbone, in the centre of their chest, making sure you keep the fingers off the ribs.
- Lean over the child, with your arm straight, pressing down vertically on the breastbone, and press the chest down by at least one third of its depth.


- Release the pressure without removing your hand from their chest. Allow the chest to come back up fully – this is one compression.

- Repeat this 30 times, at a rate of about twice a second or the speed of the song ‘Staying Alive’.
- Now give two rescue breaths.
Step 6 of 7 Call for help
- Remember to call for emergency help after about a minute if you are on your own.
- Carry on giving 30 chest compressions followed by two rescue breaths for as long as you can, or until help arrives. If the child starts breathing normally again, stop CPR and put them in the recovery position.
*************************************************************************************
Cardiopulmonary resuscitation (CPR)for Children
1. Check to see if the child is conscious
- Make sure you and the child are in safe surroundings.
- Tap the child gently.
- Shout, “Are you OK?”
- Look quickly to see if the child has any injuries, bleeding, or medical problems.
2. Check breathing
- Place your ear near the child’s mouth and nose. Is there breath on your cheek? Is the child’s chest moving?
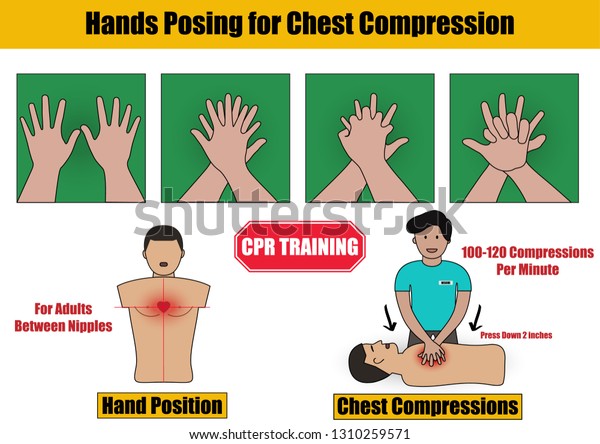
3. Begin chest compressions
If the child doesn’t respond and isn’t breathing:
- Carefully place the child on his/her back. For a baby, be careful not to tilt the head back too far. If you suspect a neck or head injury, roll the baby over, moving his/her entire body at once.
- For a baby, place two fingers on breastbone. For a child, place heel of one hand on center of chest at nipple line. You also can push with one hand on top of the other.
- For a child, press down about 2 inches. Make sure not to press on ribs, as they are fragile and prone to fracture.
- For a baby, press down about 1 1/2 inches, about 1/3 to 1/2 the depth of chest. Make sure not to press on the end of the breastbone.
- Do 30 chest compressions, at the rate of 100 per minute. Let the chest rise completely between pushes.
- Check to see if the child has started breathing.
- Continue CPR until emergency help arrives.
4. Do rescue breathing
- To open the airway, lift the child’s chin up with one hand. At the same time, tilt the head back by pushing down on the forehead with the other hand. Do not tilt the head back if the child is suspected of having a neck or head injury.
- For a child, cover his mouth tightly with yours. Pinch the nose closed and give breaths.
- For a baby, cover the mouth and nose with your mouth and give breaths.
- Give the child two breaths, watching for the chest to rise each time. Each breath should take one second.
5. Repeat compressions and rescue breathing if the child is still not breathing
- Two breaths can be given after every 30 chest compressions. If someone else is helping you, you should give 15 compressions, then 2 breaths.
- Continue this cycle of 30 compressions and 2 breaths until the child starts breathing or emergency help arrives.
- If you are alone with the child and have done 2 minutes of CPR (about 5 cycles of compressions and breathing), call 911 and find an AED.
6. Use an AED as soon as one is available
For children age 9 and under, use a pediatric automated external defibrillator (AED), if available. If a pediatric AED is not available, or for children age 1 and older, use a standard AED.
- Turn on the AED.
- Wipe the chest dry and attach the pads.
- The AED will give you step-by-step instructions.
- Continue compressions and follow AED prompts until emergency help arrives or the child starts breathing.
